From Closet Floor to Live Listing in One Focused Hour
Set a time limit and stick to it: rushed beats perfectionism every time.

Turning closet clutter into live listings takes a timed sequence. The one-hour listing sprint breaks the job into sorting, sold-price research, photos, listing copy, and publishing. The shortcut is to finish each step before improving it becomes a second job.
Why clutter doesn't turn into cash — and what actually stops sellers
The obstacle is usually an open-ended process. Sorting becomes a room-wide excavation, pricing becomes research, and photography waits until the house looks presentable. Nothing reaches a buyer. The instinct to “do it properly” gives every stage permission to sprawl, so a small selling task acquires the administrative weight of a house move.
Ownership can also distort the price you choose. Kahneman, Knetsch, and Thaler’s classic experiment found that owners demanded roughly twice as much to give up an object as non-owners were willing to pay. Your fondness is not a buyer’s budget. But that bias is a supporting problem, not the whole explanation, and a timed workflow addresses both by giving pricing an evidence-based rule and every stage a stopping point.
What the one-hour sprint looks like before you start
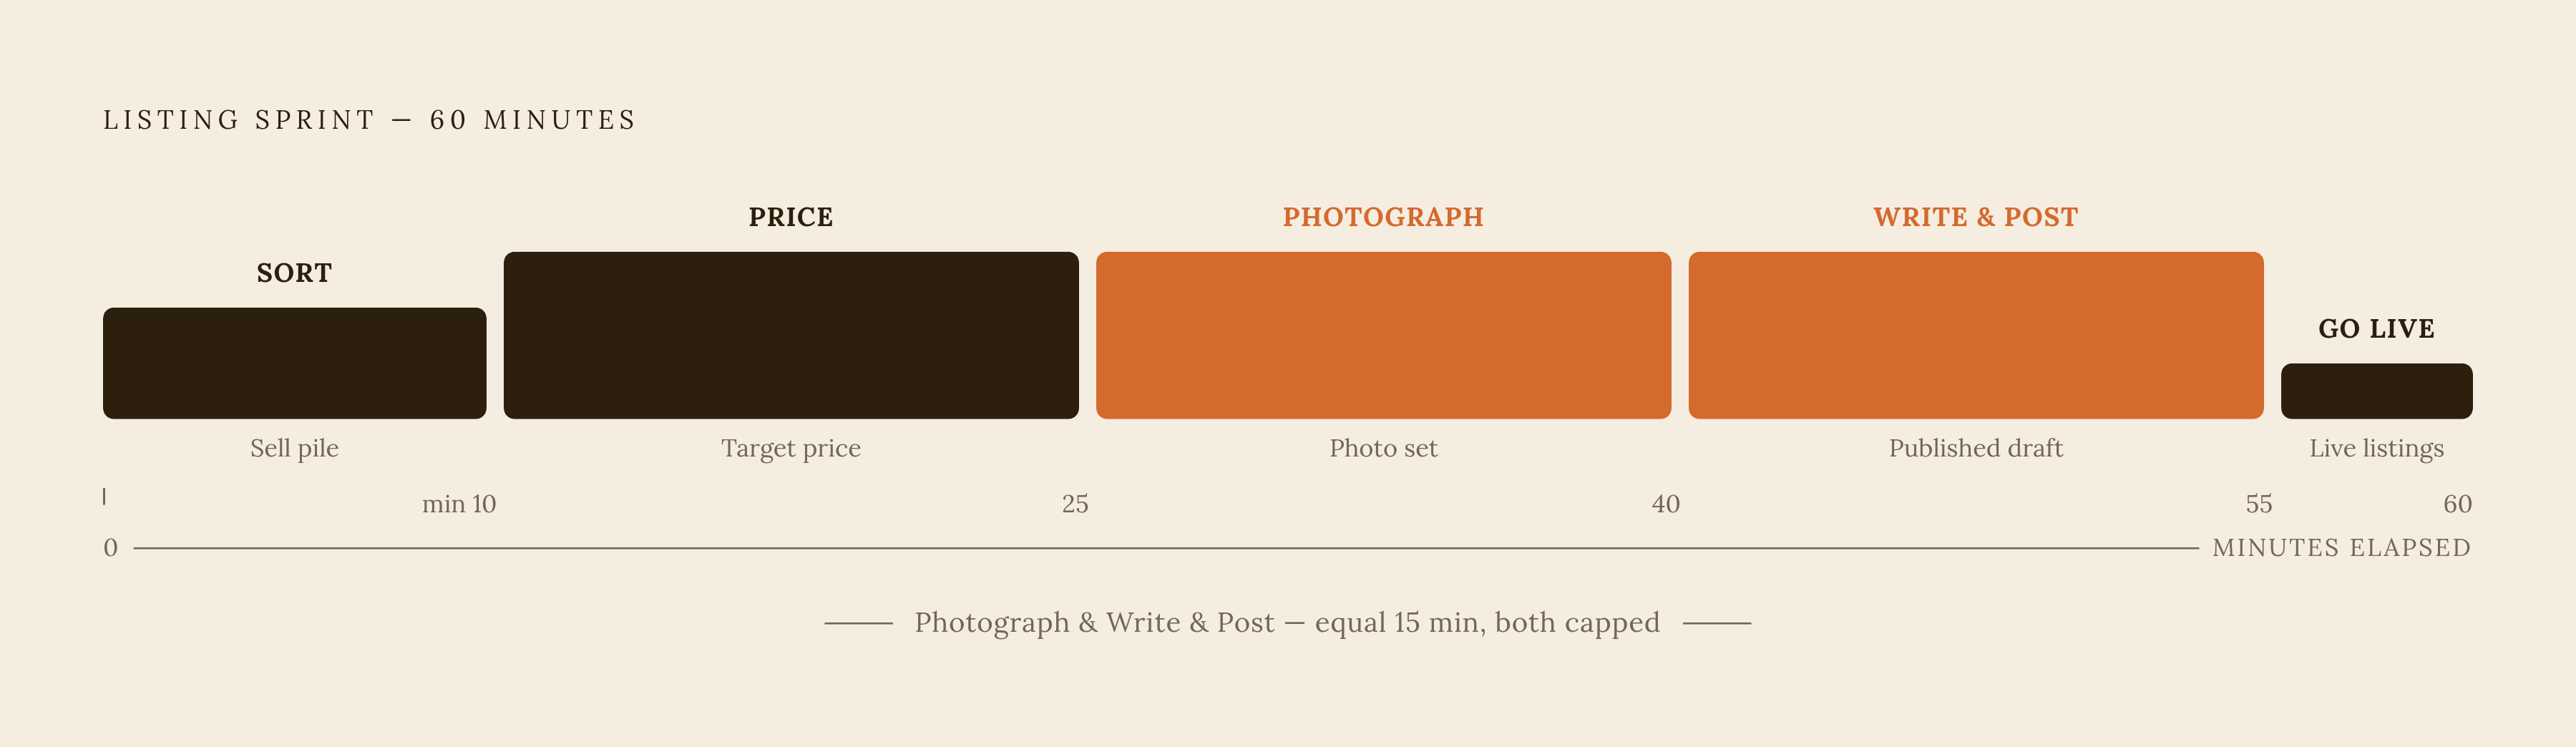
Choose one room or one category. Scope is what makes the hour work. Allow ten minutes to sort, fifteen to price, fifteen to photograph, fifteen to write and post, and five to review and go live. Each block has a different output, so the next task begins with what it needs.
Before starting the clock, prepare a clear surface, daylight near a window, a neutral backdrop such as a plain wall or sheet, and a charged phone. The sort has just three destinations, which are keep, sell, and donate. There is no “maybe” pile, because maybe is where an afternoon goes to retire. Anything that earns that label goes to donate, leaving the selling time for items you have actually decided to release.
Phase 1 (minutes 0–10): Sorting for what will actually sell
Start with categories that tend to hold resale value. Solid wood furniture, quality leather goods, designer clothing, vintage pieces, and mid-century modern items belong in the first pass. Brand names provide another quick signal. Look for kitchen equipment from Le Creuset, KitchenAid, and All-Clad, power tools from DeWalt and Milwaukee, and professional-grade hand tools. These signals help you make the sell decision in seconds rather than researching every object while standing over it.
Donate mass-market flat-pack furniture, particle board items, generic small appliances, and fast-fashion clothing so they leave you time for the rest of the sprint. Electronics deserve a different rule. Before recycling or throwing away anything with a screen or battery, check recent sold prices during the pricing phase, since phones, tablets, and gaming consoles can retain meaningful value despite their age.
For a compact starting area, the bedroom closet can hold a high concentration of value. Unused electronics in drawers, unopened gifts, jewelry, and name-brand clothing take little space but can produce outsized returns. A move changes the priorities slightly. Bread makers, pasta machines, and juicers unused for a year or more are strong sell-pile candidates when their bulk costs more to move than they are worth keeping. At ten minutes, the sell pile is settled, so resist the urge to reopen negotiations with yourself.
Phase 2 (minutes 10–25): Setting a price from what buyers actually paid
Set your price from sold listings rather than what sellers are asking in active listings. Asking prices show what sellers hope to get, while sold prices show what buyers paid. Hope is not a comparable sale. Copying an optimistic active listing can leave your own “quick sale” sitting for weeks, even when the item itself has buyers. Recent completed transactions give you a firmer anchor than memory, original cost, or attachment.
On eBay, search for the item and filter to sold listings. If you use completed listings, count only those that actually sold. Look at the last several sales, ignore outliers, and choose a price within the middle cluster. Match condition as closely as possible. A worn example and a boxed, barely used example may share a model name without supporting the same price.
Use condition as a quick cross-check on sold data. Like-new or barely used items with boxes or tags may sit around 50–70% of retail, while good, lightly used, fully working items typically fall in the lower half of that range. Visible wear should lower the number further. Fair but functional items belong meaningfully below good examples, and rough or for-parts items should be priced well below working ones. These distinctions keep “excellent condition” from becoming a ceremonial phrase applied to everything.
When there are few sales or the item has a niche market, eBay’s Product Research tool, formerly Terapeak, lets you search years of past sales. It is free in Seller Hub, with at least one sale required to opt in, while mobile access also requires an active listing or recent sale. Most casual items need less digging. On Facebook Marketplace, where buyers routinely use “Make an offer,” price a little above the sold-comp median to leave negotiating room. The cushion should allow a conversation while keeping the item in the same price bracket.
Phase 3 (minutes 25–40): Photographing the sell pile before you move anything
Photograph the whole sell pile now, before reorganizing it. Working through the items one by one saves you from having to find, set up, and shoot each one later. Keep the phone and backdrop ready throughout. Use the daylight and plain background you set up before the clock started for all the items. Take photos of large furniture before moving it, because hauling a dresser to a spot that seems better can use up the time saved elsewhere.
Aim to take at least five photos of each item. Cover the front, back, sides, labels or brand markings, and a close-up of any visible flaw, adding shots when those details need separate views. Give the scratch its own photograph, too. A buyer who sees wear before messaging can accept that tradeoff, while someone who discovers it after traveling for pickup has a reason to renegotiate or cancel. Honest photos help filter for people who want the item in its actual condition.
Buyers who can see condition have fewer unanswered questions and fewer reasons to haggle over uncertainty. A dresser photographed in bright light against a clear background can sell for more than the same dresser shown in a dim, cluttered room. The aim is a useful record of the item.
Phase 4 (minutes 40–55): Writing the listing and choosing where to post
Put the type of item, its brand when it matters, its key feature, and its condition in the title. “KitchenAid Stand Mixer 5Qt Tilt-Head Excellent Condition” and “DeWalt 20V Drill Driver Kit Like New” show the pattern. The title has a practical job to do. It should tell buyers what they are looking at without making them open the listing to identify it. Reuse the structure for each item.
The description should turn the photos and price into a complete offer. Be honest about its condition, list scratches or missing parts, and give dimensions or specifications where they matter. Keep the useful details close together. Put the original retail price beside the asking price so buyers can compare them, but base what you charge on what similar items sold for. Then state pickup or shipping terms and your payment preference so buyers do not need a preliminary conversation just to understand the deal.
Choose the platform by category in under two minutes. Use eBay for electronics and collectibles, where buyers search for specific items and seller protection after the sale depends on tracking and a record of the item's condition. Heavy goods need a different route. Facebook Marketplace local pickup suits furniture and appliances because shipping is costly or inconvenient, and local pickup has no platform fee. Poshmark works well for women’s fashion, shoes, and accessories because people browse it for fashion and there is less back-and-forth over price.
Compare how much of the sale price you keep. eBay’s final value fee is roughly 13.6% plus a small per-order charge in most categories, with 250 free listings per month. Poshmark uses a flat fee for smaller sales and a percentage for larger ones, with prepaid shipping labels included. Higher fashion prices can offset its higher fee. Vinted charges buyers instead of sellers, while Facebook’s current shipped fee must be checked through Facebook Help before it is used to work out how much of the sale price is left.
Phase 5 (minutes 55–60): Going live and setting the week's maintenance cadence
Use the final five minutes to review and publish. The final review should confirm that photos load, the price matches the target from Phase 2, and the condition description is honest. Make sure buyers can see the pickup or shipping terms and how you prefer to be paid before you hit publish. Keep this final check focused on decisions already made.
Once the listings are live, set a simple maintenance cadence. Renew them weekly before they go stale, but respond sooner when an item draws no serious inquiries within two to three days. Price is then the most likely cause. Drop it to or just below the median sold comp and renew, and consider bundling it with a related item or donating it if it still has not moved after a week.
Early engagement, including messages, saves, and clicks, helps listings reach more buyers. A correctly priced item that sells quickly is better for the next listing’s visibility than one that lingers. The next session can cover the same room or a new category using the same five phases and the same clock.
Scams and safety signals to build into every listing
During Phase 4, put terms for a safe sale in the description. State how to pay, how pickup will work, and what condition the item is in so these details are settled before private messages begin. Clear terms remove ambiguity from the first message. Phrases such as “cash or verified Zelle only,” “no shipping,” and “will meet at public exchange location” make the intended deal explicit where relevant. Avoid “DM for details” on higher-value items, because it forces every buyer into a conversation and gives phishing requests another opening.
Say no when someone asks to move a sale off the platform. Seller protections apply only to transactions that happen on the platform. An overpayment is another clear stop signal. If someone pays too much and asks you to return the difference, refuse and report the offer rather than treating it as a harmless accounting error.
For smaller local-pickup items, meet in a public place. When a large item has to be picked up at home, have someone else there. These arrangements belong in the workflow from the start. They let you finish the listing with a plan for the handoff, rather than improvising after someone says they are on the way. The hour ends with an item ready for a buyer, including clear terms for how the sale should happen.